How To: 16 Ways to Improve Your Privacy & Security on Instagram
As with most social media platforms, Instagram can be a double-edged sword. On one hand, it's a great way to share and express yourself — but on the other, it can be just as effective at compromising your privacy and security. Thankfully, there are a few things you can do to protect yourself.As with all things regarding cybersecurity, no plan is foolproof. So be aware that even if you implement these tips, you are still at risk of having your personal data fall into the wrong hands. However, by adjusting these settings in the Instagram app for Android or iPhone, you will dramatically lower your risks.Don't Miss: The 4 Best Phones for Privacy & Security
Tip 1: Enable Two-Factor AuthenticationOne of the easiest things you can do to improve your defenses is to enable two-factor authentication (2FA). This will require that you add your phone number to your account (if you created your account with just your email or Facebook credentials), but will add an additional layer to your security.With two-factor authentication, you'll need both your password and a one-time passcode (OTP) to log into your Instagram account. This OTP is sent to your phone when you're trying to log in. In principle, hackers will be prevented from accessing your account unless they also have physical access to your phone. Instagram –> Profile –> Menu –>
Settings –> Privacy and Security –>
Two-Factor Authentication –>
Get Started –> Text Message
or Authentication App To enable 2FA, head to the profile tab in the Instagram app, tap the menu button (three lines) in the top right, and select "Settings" on the bottom. Then, choose "Privacy and Security," and select "Two-Factor Authentication."Tap on the "Get Started" button (if you see it), then turn on the switch next to "Text Message." A code will be sent to your phone number through text message, which you then need to input. Once that's done, 2FA is enabled on your account.You can also choose to enable the "Authentication App" option, which is actually a more secure method of two-factor authentication. Check out our roundup of the best two-factor authentication apps to learn more and see which ones are worth using on your iPhone or Android phone.Don't Miss: The 5 Best Two-Factor Authentication Apps for iPhone & Android Images by Nelson Aguilar/Gadget Hacks
Tip 2: Save Your Instagram Recovery CodesTwo-factor authentication requires you to have access to your either your SMS texts or your smartphone's authentication app, depending on what you chose, but what happens if you've recently changed phone numbers or don't have your smartphone on you? You can use recovery codes as a backup, as long as you thought ahead and saved them somewhere such as a password manager that you can still access. Instagram –> Profile –> Menu –>
Settings –> Privacy and Security –>
Two-Factor Authentication –>
Recovery Codes To access the codes from your account, visit your "Two-Factor Authentication" settings on Instagram, then choose "Recovery Codes." Screenshot them (which could be backed up online), copy them to a password manager (like LastPass), or even jot them down on a piece of paper you keep in your wallet. However you choose to secure the codes, there will be five total, and each code can only be used once. When you've used up all the recovery codes, you can request a new set.Full Guide: Use Instagram Recovery Codes to Access Your Account Images by Nelson Aguilar/Gadget Hacks
Tip 3: Use a Password ManagerBesides the OTP, authentication app, or recovery codes, your password is the main gatekeeper that prevents access to your account. Unfortunately, so many users are protecting their account with a password that is easy to memorize, which has the unintended consequence of being an easier password to hack, unfortunately.Instead of relying on a memorized password, use a password manager to create one for you. Unlike something you create, the password manager is guaranteed to be as strong as needed since you can control the criteria it needs to abide by. Additionally, you can change your password easily (we recommend every 90 days) to ensure hackers don't have much time to guess your password.Install LastPass: Android (free) | iOS (free) Whether you are using iOS or Android, we recommend using LastPass Password Manager. Its low cost combined with a vast feature list is unmatched by any other manager in either app store. Check out our full rundown of why LastPass is the best, then try it out to help secure your Instagram account.
Tip 4: Turn Off GeotaggingMost camera apps will tag your photos with coordinates that show where they were taken, and Instagram is no different. It's a great way to recall previous adventures at specific locations, but with this metadata attached to your photos, unwanted individuals can easily learn your location.It should be noted that Instagram strips all EXIF data from images you upload, so if you took the photo with your stock camera app or a different third-party camera, it won't automatically send out its geolocation data to all of your followers. However, Instagram does read the geolocation data so that if you'd like to "Add Location" before sharing, it'll help you find the appropriate place without hunting too hard.To keep your current location out of other Instagram users' hands, just don't add a location on the final step before tapping "Share." If you must, only add locations that won't aid someone in tracking your current location or your daily routes, such as vacation spots from weeks ago. Android: Android Settings –>
Security & location –>
Location –> See all –>
App Name –> Permissions –>
Location
iPhone: iOS Settings –> App Name –>
Location –> Never If you don't want Instagram reading your geolocation, or if you don't want Instagram to record your location when taking a photo inside the app, you can turn off geotagging for Instagram and each of the camera apps that you use. For stock Android, you can disable "Location" app permissions in the Settings app, but this may differ on non-stock Android. For iOS devices, locate the camera app's "Location" permissions in Settings, and disable it.Don't Miss: Stop Your iPhone Photos from Broadcasting Your Location Disabling "Location" on a Pixel (left) and iPhone (right). Images by Nelson Aguilar/Gadget Hacks
Tip 5: Require Approval for Tagged PhotosYour presence on Instagram goes beyond the pictures you personally upload. If anyone else takes a picture of you and tags you in it, that photo will also show on your page, regardless of if you wanted it there. Fortunately, you can change that by requiring approval before it's added to your profile. Instagram –> Profile –> Menu –>
Settings –> Privacy & Security –>
Photos and Videos of You –>
Add Automatically (Off) Go to your profile tab in Instagram, tap the menu icon, then "Settings." Next, select or find "Privacy and Security," then choose "Photos and Videos of You." Toggle off "Add Automatically" so that each post you're tagged in will require that you manually approve it before it's added to your profile. You can also tap on "Hide Photos and Videos" to hide any posts that you've already been tagged in.Full Guide: How to Keep People from Tagging You in Instagram Posts Images by Nelson Aguilar/Gadget Hacks
Tip 6: Turn Off Your Green Dot Activity StatusAt the start of 2018, Instagram added an "Activity Status" feature that shared with other users if you're online or when you were online last. Later that year, they added a green dot to help location users that are currently active.Activity Status exists in your direct messages and friends list (when you share a post as a direct message), and while it's useful to see when your friends are online, you may not want others to know when you're active. Instagram –> Profile –> Menu –>
Settings –> Privacy & Security –>
Activity Status –> Show
Activity Status (Off) To disable this, open the menu from your profile, select "Settings," then find or choose "Privacy and Security." Next, select "Activity Status," and toggle off "Show Activity Status." Your friends and family will no longer be able to see your activity status, and you also won't be able to see theirs (even if they have it enabled).Full Guide: Go Incognito on Instagram by Turning Off Your Activity Status Images via Instagram, Jake Peterson/Gadget Hacks
Tip 7: Prevent Others from Sharing Your Posts to Their StoriesMany of Instagram's features are automatically enabled when they're newly introduced, and that includes the ability for other users to share your photo and video posts to their Stories. Making your Instagram account private disables this feature, but you'll have to manually disable it if you enjoy the public life. Instagram –> Profile –> Menu –>
Settings –> Privacy & Security –>
Resharing to Stories –>
Allow Resharing to Stories (Off) Open up the in-app settings, then select "Resharing to Stories" settings under the "Privacy and Security" umbrella. Toggle off "Allow Resharing to Stories," and other users will no longer be able to share your posts to their Stories.Don't Miss: Share Your Friends' Instagram Stories in Your Own Story
Tip 8: Stop Others from Sharing Your Stories as DMsAnother Instagram Stories feature that's automatically enabled is letting others share your stories through Direct Messages. This means anyone that can view your stories can also share it through DMs to anyone else (if your profile is public) or your just followers (if you're private). Instagram –> Profile –> Menu –>
Settings –> Privacy & Security –>
Story Controls ->
Allow Sharing (Off) If you want to stop others from sharing your stories, you can disable the feature pretty easily by going to the "Story Controls" option under the "Privacy and Security" section in the in-app settings. Toggle off "Allow Sharing," and people will no longer be able to share your story as a message.Full Guide: Prevent Friends from Sharing Your Stories as Direct Messages Images by Nelson Aguilar/Gadget Hacks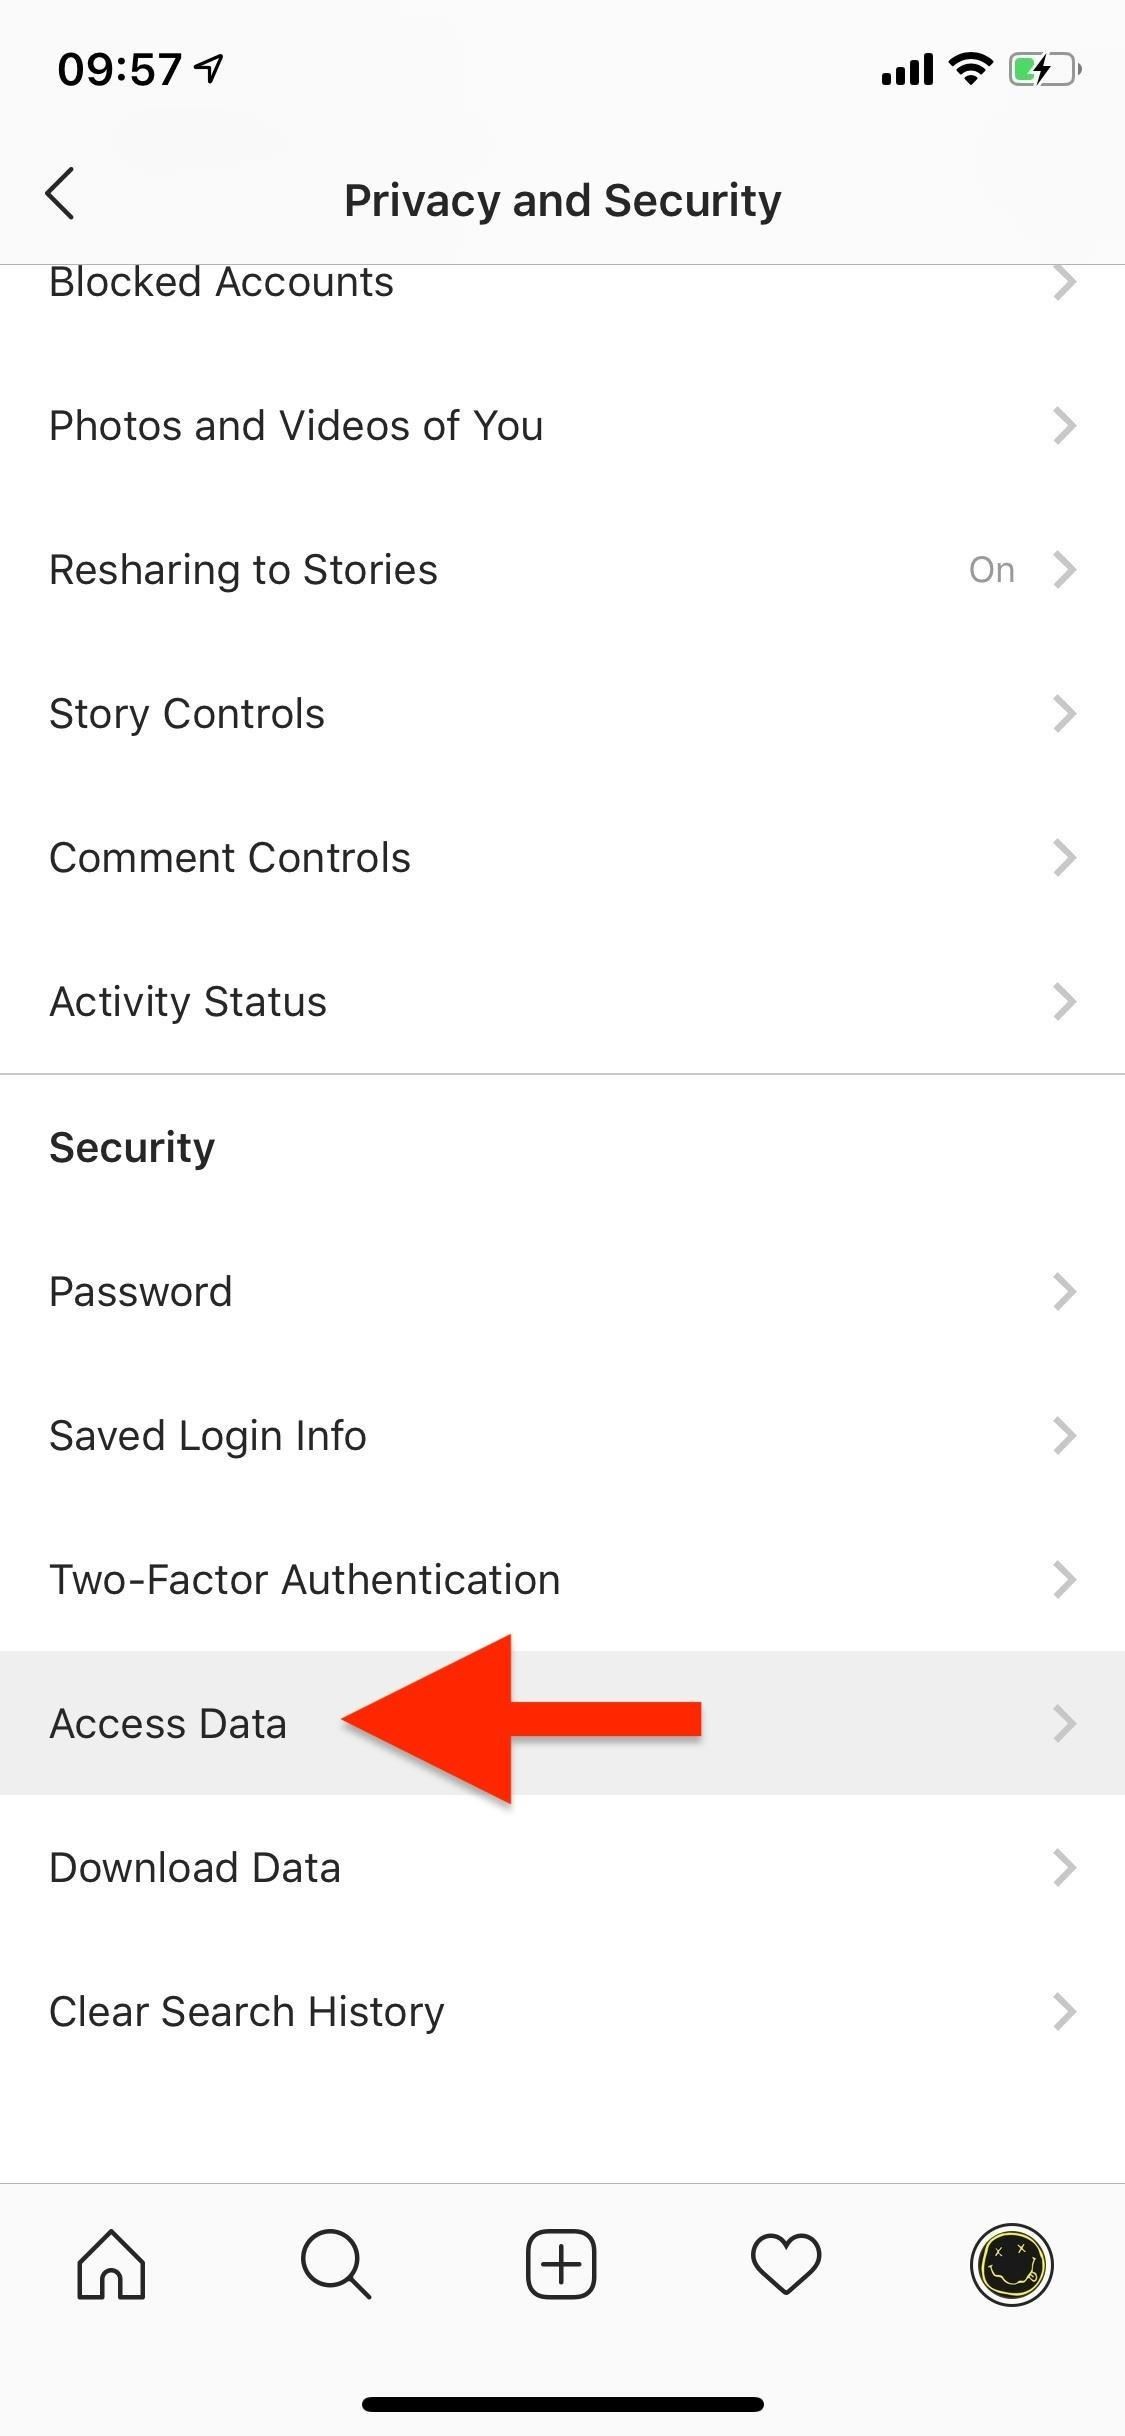
Tip 9: View Past Account ActivityInstagram keeps a record of important account activity, such as a new password, a different email, and any logins/logouts. If any changes have been made without your knowledge, this is where you can find out. Instagram –> Profile –> Menu –>
Settings –> Privacy & Security –>
Access Data To access your past activity, go to your in-app settings and select "Access Data" under the "Privacy and Security" results. You can view account privacy changes, password changes, logins, logouts, search history, and more. If you notice logins that don't make sense or other unusual activity, your best bet is to change your password immediately.Don't Miss: Download an Account Backup to Save Photos, Comments & More Images by Nelson Aguilar/Gadget Hacks
Tip 10: Clear Your Search HistoryIf you let someone else browse through your account, they could view your recent search history with just a few taps. Fortunately, you can just as easily clear it, wiping away all those embarrassing "cat" searches. Instagram –> Profile –> Menu –>
Settings –> Privacy & Security –>
Search History –>
Clear Search History In your in-app settings, select "Search History" in the "Privacy and Security" section, and tap on "Clear Search History" to delete your searches. However, you maystill see accounts you've searched for under Suggested on the search page. You can individually remove those accounts by tapping on the "X" to the right of the profile picture on the search page. Images by Nelson Aguilar/Gadget Hacks
Tip 11: Control Comments on Your PostsComments can quickly spiral out of control if you post something controversial, especially if your account is public. Trolls may come out in droves to leave nasty and offensive remarks on your photos and videos, but you can take action by controlling who can comment and what they can write. Instagram –> Profile –> Menu –>
Settings –> Privacy & Security –>
Comment Controls From the in-app settings, go to "Comment Controls" in the "Privacy and Security" section. Here you can manage who can comment on your posts (everyone, people you follow, your followers, or the latter two combined), block comments from certain users, and enable filters to hide offensive comments.Instagram uses artificial intelligence to block comments it considers offensive. You can also add your own words or phrases to manually filter out comments. There's also a filter to hide comments that contain words that are commonly reported on your posts. Images by Nelson Aguilar/Gadget Hacks
Tip 12: Stop Third-Party Apps from Accessing Your AccountIf you've ever used a third-party app to monitor who unfollowed you or share your photos on a dating platform, you may also have inadvertently provided those services with more access to your Instagram account than you may be comfortable with. Although not all third-party apps do this, they do have the potential to like photos, comment to posts, and upload to your account — all without you knowing. https://www.instagram.com/accounts/manage_access Even if you stop using the third-party apps and services, they can still access your account, so it's important to find these "authorized" apps and revoke their permissions. You can't do this from your Instagram app, so it needs to be done in your mobile browser of choice.Full Guide: Stop Third-Party Apps from Accessing Your Instagram Account Images by Nelson Aguilar/Gadget Hacks
Tip 13: Remove Certain Contact Info from Your AccountYou share your information, such as your phone number and social media, because you want to connect with people, but sometimes you may be giving up more than you originally thought. Did you know that anyone with your number saved in their contacts or who has added you on Facebook can easily find your Instagram account? Remove Phone Number:
Instagram –> Profile –>
Edit Profile –> Phone (Remove)
Unlink Your Facebook:
Instagram –> Profile –> Menu –>
Settings –> Account –>
Linked Accounts –> Facebook –>
Unlink Account All it takes is for them to check out their Find Friends or Follow Facebook Friends page on Instagram and your account is sure to pop up — unless you do something about it. If you remove your phone number and unlink your Facebook from Instagram, users with your account info will have a harder time finding you.Full Guide: Prevent People with Your Contact Info from Finding Your Instagram Image by Nelson Aguilar/Gadget Hacks
Tip 14: Make Your Account PrivateFor maximum privacy, your account can't be public. Any public account can be accessed by anyone, which can lead to your photos and videos being copied by catfishers and other malicious individuals. However, privacy does come at a cost. For example, for those creating brand awareness, anything that hinders individuals from discovering you will hurt your progress. For that reason, this tip is optional based on your needs. Instagram –> Profile –> Menu –>
Settings –> Privacy & Security –>
Account Privacy –>
Private Account (On) If you are an average Joe who uses the platform to connect with friends, go into your in-app settings, tap on "Account Privacy" in the "Privacy and Security" section, and turn on the toggle next to "Private Account." Once enabled, only those who you approve can see your content. Your current followers will not be affected by your decision. Images by Jon Knight/Gadget Hacks
Tip 15: Temporarily Disable Your AccountYou don't need to delete your account to hide it from the world. Instead of permanently erasing your profile, just temporarily disable it. You can't disable your account from the Instagram application, so you must use a mobile web browser. https://www.instagram.com/accounts/edit Log in to the account settings, scroll down, and tap on "Temporarily disable my account." Once your account is disabled, it'll look like it's deleted. When you search for it, it will say that the page isn't available or that the account is not found. To reactivate your account, just log back in online or in the mobile app.Full Guide: Temporarily Disable Your Instagram Account for an #InstaBreak Images by Nelson Aguilar/Gadget Hacks
Tip 16: Use Instagram WiselyBesides technological solutions, there are a few personal choices you can make to protect your private information when Instagramming on your phone.First, remember that whatever you post (even with a private account) is accessible by other people. Don't post pictures that you might regret later on in life — particularly ones you might be ashamed of later or pictures that reveal personal information. Always remember, anything that can be used against you will be used against you.Second, be aware that your profile doesn't need to be completely filled out. Don't reveal to others information that isn't needed. Despite whatever trust you may have with your followers, it only takes one person to make a decision that can impact your life.Finally, use the block user feature. While in your "Followers" list, tap any user who you don't know or is toxic and select the ellipsis (•••). In the pop-up, choose "Block" to disable access to your account.Don't Miss: Mute People on Instagram Instead of Unfollowing or Blocking Images by Jon Knight/Gadget Hacks With these tips, you'll make the double-edged sword of Instagram a little less sharp. While the risk isn't averted, it is dramatically hampered.This article was produced during Gadget Hacks' special coverage on smartphone privacy and security. Check out the whole Privacy and Security series.Don't Miss: More Instagram Tips & TricksFollow Gadget Hacks on Pinterest, Reddit, Twitter, YouTube, and Flipboard Sign up for Gadget Hacks' daily newsletter or weekly Android and iOS updates Follow WonderHowTo on Facebook, Twitter, Pinterest, and Flipboard
Cover image by Jon Knight/Gadget Hacks
The title of this post is lie number one of a litany of lies to be found on the Internet. You are NOT going to learn how to rewire a vintage phone. You are not. I know this from experience. But I'm getting a bit ahead of myself as I am want to do when I'm in fits. I have a number of oddities
How to Create an Untraceable Messaging Device With an Old Phone
Part 2. How to Convert MP3 to Ringtone with iSkysoft in Seconds Turning MP3 song into a Ringtone via iTunes may seem like a tedious task. Anyway, iTunes makes a charge of 99 cents for buying ringtones.
How to Get Free Ringtones on iPhone with iTunes 12
Deepak Gupta How-to-Guides Android,Galaxy s3,KitKat KitKat update is being rolled out for many device officially, and through non officials Roms. It is expected that Samsung will roll out Android 4.4 KitKat update for Samsung Galaxy S3 in Q1 2014, but it can take more time the than expectations. But there is nothing to bother
How to Install Nova Launcher on Your Samsung Galaxy Gear for
If you have a Samsung phone, you can also unlock your phone using your Samsung account. Forgot your Android lock screen pattern, PIN or password? Here's what to do. I tested the following methods using a lock screen pattern, PIN and password and was able to unlock my LG G2 with Android 4.4.2 successfully.
Unlock Samsung Phones | giffgaff
The feature automatically converts the word into closest possible English word which is no way close to what you meant. This is where users might want to disable auto-correction. To help you with that we have listed steps to turn off autocorrect on iPhone and Mac in this tutorial.
How to Turn Off Auto-Correction on iPad Hardware Keyboards
osxdaily.com/2019/05/16/disable-autocorrect-ipad-hardware-keyboard/
If you want to turn off autocorrect completely on iPad for every possible keyboard, then you'll want to turn off autocorrect in Keyboard settings as well. That's also how you turn off autocorrect on iPhone or iPad in general, but again that Keyboard setting applies to the onscreen keyboard and not a hardware keyboard.
How to use Auto-Correction and predictive text on your iPhone
Netflix updated its Xbox One app, bringing a new interface users hate and cutting many features, such as voice navigation options, all gesture controls and the "continue watching" section.
Hacking NetFlix
Sometimes your Mac's network activity can seem like a black box. There aren't that many system tools for analyzing network activity, and Terminal commands like netstat vomit a ton of data that's hard to sort through and understand. Fortunately, you're not the only one that wants to find and
Windows 10 Settings menu: The Network & Internet tab - CNET
Facebook created 'memorial pages' as way for friends and family to share their thoughts and feelings for those that are no longer with us. As written in a company blog post , "We created the idea of "memorialized" profiles as a place where people can save and share their memories of those who've passed."
Ghost Pranks « Wonder How To
The Cool New Features in iOS 7.1 for iPad, iPhone, & iPod
Due to the sheer amount of -nix systems, including Apple's OSX Operating System, that utilize some version of the Bash shell, this vulnerability is highly-regarded as one of the biggest security vulnerabilities in history. What exactly is a "Bash"?
Security Update: Bash "Shellshock" Vulnerability - Jamf
To make Siri do all your Google Assistant deeds, you'll need to first tell those commands to Google Assistant so that they will show up as Siri Suggestions you can activate. You can use your new "Ok Google" shortcut to open Google Assistant with the mic ready, or you can open the app up manually and tap on the mic icon at the bottom.
Google Assistant Doesn't Work with Your Account? Here's What
Want to watch this again later? Sign in to add this video to a playlist. Sign in. How to Glitch into the Big Brother House (easiest method) Never Patched - Duration: 5:36.
Big Brother Is Watching You Online: How To Avoid Being Tracked
Are you tired of all of those applications bombarding you on Facebook?Spamming you all the time, never stopping? Are they just annoying? Well, this video tutorial will show you how to remove unwanted, spammy, or otherwise annoying apps on Facebook.
3 Ways to Remove Unwanted Apps that Won't Delete on Mac
We wanted to find out the secret behind her ability to curate Instagram for a beautiful, engaging, and flawless feed. Read on for her tips on how to improve Instagram for a stronger social strategy. You currently have over 53,000 Instagram followers.
How To Fix Your Instagram Explore Feed Algorithm
0 comments:
Post a Comment